Removing old popcorn ceiling textures from ceilings and replacing it with a flat ceiling or a smooth ceiling seems to be a popular ceiling refinishing finish option that plenty of Calgary and surrounding area residents seems to be very interested in. Removing old popcorn ceilings and replacing the old popcorn ceiling texture with a new knockdown ceiling, or a new splatter ceiling, ceiling painting, or simply removing old popcorn and replacing with new popcorn ceiling texture finish also seem to be other popular options customers call often about.
Taking on a popcorn ceiling to flat painted ceiling project from start to finish is likely a much bigger project then you might think it is, or expect it to be. A little bit of insight now into exactly how a typical popcorn ceiling to flat ceiling refinishing project gets completed, and what your particular site location options are, can take you a long way to helping you decide if you want to proceed, and the process or steps and or options that will need to be completed to see your new ceilings finish up to a new beautiful finish.
You'll also get some information and tips on what you can do to make your house, home, or property ready for a new popcorn ceiling to smooth flat paint grade painted ceiling, how to help you get very close to near perfect premium quality results, and of course how to help keep your prices and costs down where possible and appropriate. Every house and home and property is different so prices and production times can and likely will vary from one house and home or property to the next.
One of the best ways to help you get the best results on your popcorn ceiling to flat ceiling is to make sure that you hire an experienced ceiling refinishing professional. If you find and hire an expert experienced ceiling refinishing professional you have a substantially much better chance of getting much higher quality results then you might get delivered to you from other local popcorn ceiling removal companies that doesn't have as much experience.
If you hire in the wrong ceiling refinishing expert, painter or the wrong Calgary ceiling texture removal refinishing expert you might not be completely satisfied with your results if you are expecting perfectly flat ceilings. Your best bet is to go with a qualified professional popcorn ceiling to flat painted ceilings expert that professionally house paints, installs, removes, and repairs ceiling texture and drywall repairs every day in the normal course of business. You need a pro house painter and ceiling refinishing expert in one. We can help.
Removing your old popcorn ceiling and getting it ready to be converted to a flat painted popcorn ceiling or to a new type of ceiling texturing finish is an extremely dirty job. Really dirty. You are very likely to find many local ceiling finishing and ceiling refinishing companies want you to completely empty out your house, home, or property to convert your ceiling from popcorn to flat. You may likely be inconvenienced by being required to completely empty your home of all of your property and possessions for the ceiling conversion process to be completed.
And of course you will have to load all of that stuff of yours back into your house, home, or property again once your ceiling is finished. It's good business practice and the default safe option to getting your ceiling converted from popcorn ceiling texture to flat or smooth painted ceiling finishes. It's also completely possible for the most part to just leave everything right where it is in place and work with a seasoned ceiling refinishing expert that can ceiling refinish your ceilings in occupied houses, homes, and property.
The next thing that you should be aware of is that you will very likely require repainting of your walls or at least touch ups and repairs on some walls in every room of the house.
Depending on the type of popcorn ceiling removal process that your ceiling technician or painter uses you may find that you have more than just the ceiling to contend with. You may see a lot of local ceiling texturing companies and ceiling refinishing companies remove popcorn ceilings by spraying and popcorn ceiling texture with water and then scraping the popcorn texture off once it's softened up. This is a very good method to remove popcorn ceilings and popcorn ceiling texture from your ceilings.
Well that may do wonders to help get your popcorn ceiling texture off your ceiling, however, when you go to remove the wet tapes that are now extra sticky because they got wet, you are likely to get the paint pulled off with the tape when you remove the protecting plastic that is used in the coverings of your walls. These repairs and touch ups are typically inevitable and simply part of the process. The best way to work around this or to address the issue is to simply plan on repainting your walls again the same color after you touch up and repair the affected areas.
Repairs and one coat of touch-up paint and one coat of paint on each wall is sufficient to get your walls back in tip top shape again if they've suffered any type of damage or repair issues due to tape and plastic being removed from your walls after the popcorn ceiling has been stripped or removed and your ceiling finished. For best results and a clean and fresh experience you should seriously consider repainting walls after removing popcorn ceilings and converting to a flat ceiling.
If you have been thinking about changing the color in your walls this is probably a pretty good time to have your ceiling finishing expert and painter go about repairing and painting your walls in your new color. You should certainly plan on at least minimum repairs being required along the way of converting your popcorn ceiling to a flat painted paint grade ceiling. You will likely get better pricing and lower costs all around by painting or repainting during the popcorn ceiling removal process.
If you have never painted out walls connected to a new flat ceiling you should consider hiring a professional. An experienced and professional painter will know exactly how to properly repaint your walls more specifically where it connects to your ceilings. The easiest way to go about doing that is to simply hiring a competent painter in the first place and paying extras for your painter to professionally paint your walls again after you've completed the popcorn ceiling removal to flat painted ceiling process. Decide to go it alone and do it yourself you could make a mess all over your new flat ceiling by trying to save a couple of bucks.
There are plenty of ceiling texturing companies that will remove your popcorn ceiling and convert it to a new flat painted ceiling however not many ceiling texturing companies actually do professional interior painting as well. For best results and the best price consider hiring on a ceiling texturing refinishing expert that can strip and remove your popcorn ceilings and patch and repair and mud and tape your ceilings to perfection before spray painting in a new perfect ceiling painting finish.
Popcorn ceiling removal and ceiling refinishing is a trade that isn't practiced by very many local drywall tapers drywall borders or painters and decorators in the Calgary Alberta area. You likely have just a small handful of individuals or companies that are capable of delivering you premium results. We have seen plenty of jobs that have gone South and resulted in poor ceiling finishes or poor ceiling refinishing results simply because the customer hired the wrong ceiling expert to complete the work for them.
The process:
1:) preparation.
You likely heard before that a great paint job finished starts with good preparation. If you have never removed popcorn ceiling from your ceiling before you might not know that it is extremely dirty. Much skill, time, and effort must be put into proper preparation of your house and home interior before the process starts. If you don't do a perfect preparation job the first time it will show in your work and you wish you had. That's the difference between a popcorn ceiling to flat painted ceiling expert and a hack. You might not know any better if you don't have any experience.
2:) removing popcorn ceiling.
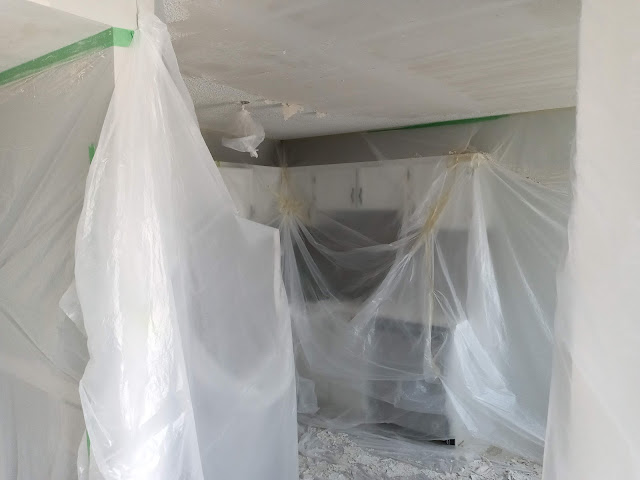
After proper preparation of your house and home interior adequate amounts of plastic and tape to cover absolutely everything on your walls and floors and exposing just your ceiling it's time to get down to popcorn ceiling removal. There's basically three common methods used to remove popcorn ceiling from your ceilings. The first method is the good old dry scrape. The second method is the soak and scrape method. And the third method is sending or grinding off your popcorn ceiling with an appropriate popcorn ceiling removal machine. There's some pros and cons to all three methods but the soak it and scrape it is the most often used method that has been producing the best results for the last 30 years or so.
3:) skim coating drywall.
Whatever method that you used to remove your popcorn ceiling texture from your ceiling The next step is grabbing some drywall mud and skim coating two full coats of drywall mud over top of whatever is left over of your popcorn ceiling after you've tended to the popcorn ceiling removal. Of course adequate dry time will be needed between coats of drywall mud. Pay attention to dark spots the next day and between coats of drywall mud as you may run into some trouble areas that don't consistently dry out by the next day and may require an extra day or additional days to completely dry. If you cheat now you'll pay for it later so be sure that you allow adequate dry time.
4:) sanding the ceiling.
It's always a good job too start in the corners or the angles of the walls where your walls and ceilings meet. If you did a good job on your skin coating those corners should be lately filled with drywall mud and should be relatively easy to send out with a medium grit sponge and some medium grit sandpaper. You're going to be doing a painted ceiling finish so you want to make sure your corners got some sharp corners to them so that your bristles can just lightly touch the ceiling while you're painting the wall. If you miss any sanding now it will be sure to show up after you got the primer coat on. Not a big deal if your primer is sandable but you sure make extra work for yourself if you have to sand out mud that you primed over because you missed it the first pass.
5:) spray primer coat.
It's time to get the primer flying. You should always be using a spray machine to spray primer coat on your ceiling. You'll be able to spray Prime the ceiling in your house and 30 to 60 minutes or Less compared to days and days and days of brushing and rolling primer on to you soon to be new flat ceiling. Don't let anyone ever try to convince you that brushing and rolling in a ceiling is superior to spray painting in the ceiling. Those are just not the correct facts. While it might only be primer you'd be surprised how awesome just the primer coat sprayed into place can make your ceiling look. A smart way is to spray in all your angles first and then fill in the middle work your way from room to room.
6:) touch ups.
After you got your primer coat of primer spray painted on your ceiling you should allow adequate dry time and then start taking a look for drywall touch ups on your new ceiling. Certainly be on the lookout for patches that you forgot to send or rougher areas that are going to need some more mud or more primer before getting on to actual ceiling painting. Usually these areas can just be touched up with drywall mud and a knife and allowed to dry before sanding and spot priming over the corrected areas. You should set the bar high here and try to get everything patched in a dress before you get onto the painting. If not you can leave it for after the first coat of paint.
7:) spray first coat.
Once you have spray painted in the primer coat, done some touch-ups on the areas on your ceiling that requires some extra attention, sanded those areas down, spot primed them with primer, and allowed everything to dry before sanding down, you are now ready to spray out your first coat of paint. Flat white ceiling paint is extremely popular for a ceiling finish color. The easiest way is just to buy yourself adequate amount of ceiling paint and use it as is right out of the can with no additional paint color or paint tint. Any interior paint that has labeled as ceiling paint or flat white paint will do the job. We like to put generous amounts of ceiling paint on our ceilings that we convert to flat painted ceilings, be sure you do the same for best results.
8:) more touch ups.
Yes, that is correct more touch-ups. After the first coat of paint is dried over top of the dried primer, and adequate amount of time has been allowed for the paint to dry it's time for more touch-ups. You probably have identified a couple of spots in your ceiling that need an extra bit of love and attention. You can address those with more drywall mud and appropriate drying time. Once you have repaired and addressed the additional ceiling issues you can simply spot prime those with a shot of paint again and allow them to dry after sanding. If you see any other darker areas or something that looks like it doesn't have enough paint on it you can get to it on the final coat of paint.
9:) spray second coat.
And now you are ready for your final coat of finish paint. Most if not all of the issues in the ceiling should be easy to see and address by now allowing you to get on with spray painting in the second coat of paint. For best results make sure that you provide generous amounts of ceiling paint for the second coat of paint or what painters call the finish coat of paint or finish coat simply. You may find even more scratches dents and dings and repair areas while you are spraying in your second coat of paint that you may wish to touch up later. Simply spray paint your paint into place wait for things to dry and then you can get out those tougher areas again.
10:) review finished ceiling.
After the primer and two finish coats of paint have been installed on your ceiling you can basically consider your ceiling painting finished. You've removed all the popcorn, skim coated two coats of drywall mud over top of the mess that the popcorn removal process left on your ceiling, sanded it down look for touch-ups, spray it off a full thick primer coat of primer onto your ceiling and then you followed up with two thick coats of flat white ceiling paint to help your popcorn ceiling to flat painted ceiling with the best possible. If you find any tougher areas that still need more mud and paint you can simply address those small areas using the same methods above and then repainting those tough spots.
11:) touch ups on walls.
I'll let your ceiling is converted from a popcorn ceiling to a flat painted ceiling and everything is left to dry now it's time to remove all the plastic from the lights on the walls and the floor and get that mess out of your house. Removing the popcorn ceiling texture and the plastic inside of your house after painting is how you find out how good your professional ceiling finishing expert is compared to the next guy. If adequate amounts of preparation have been completed on your house interior you should just simply be able to roll up all of that popcorn ceiling texture on the floor and roll it right out the front door or the back door of your house and into the garbage. You'll likely notice that the tape comes off okay and some places and in other areas it seems to pull the paint right off your walls.
12:) paint or repaint walls.
The easiest way to address touch-ups from the tape tearing the paint off of your walls is to grab yourself some spackle or some thick drywall mud and install two to three coats of drywall mud into the damaged areas. We usually just keep adding my we don't usually send the drywall patch areas between coats. After all these areas are filled and level with the rest of the walls again a light sanding is required. After all the sanding is completed you can get on with brushing and rolling in your walls. You should simply brush in the top angles or cut in the top angles twice using a brush. Then you can brush and roll one coat of paint onto all the other areas.
And that more last covers absolutely everything that you could possibly need to know about most types of popcorn ceiling removal tool at smooth painted ceiling finishing and refinishing. For the very best results you should be thinking about hiring in and contract and with a season professional that has plenty of popcorn ceiling to flat painted ceiling finishing experience. You will get the best results possible going with an experienced professional. Very lucky enough to find yourself with ceiling text during refinishing expert that also does flat painted ceiling finishing and refinishing you can likely get yourself some of the best looking results possible if you're looking for a new interior finish you'll appreciate.


No comments:
Post a Comment